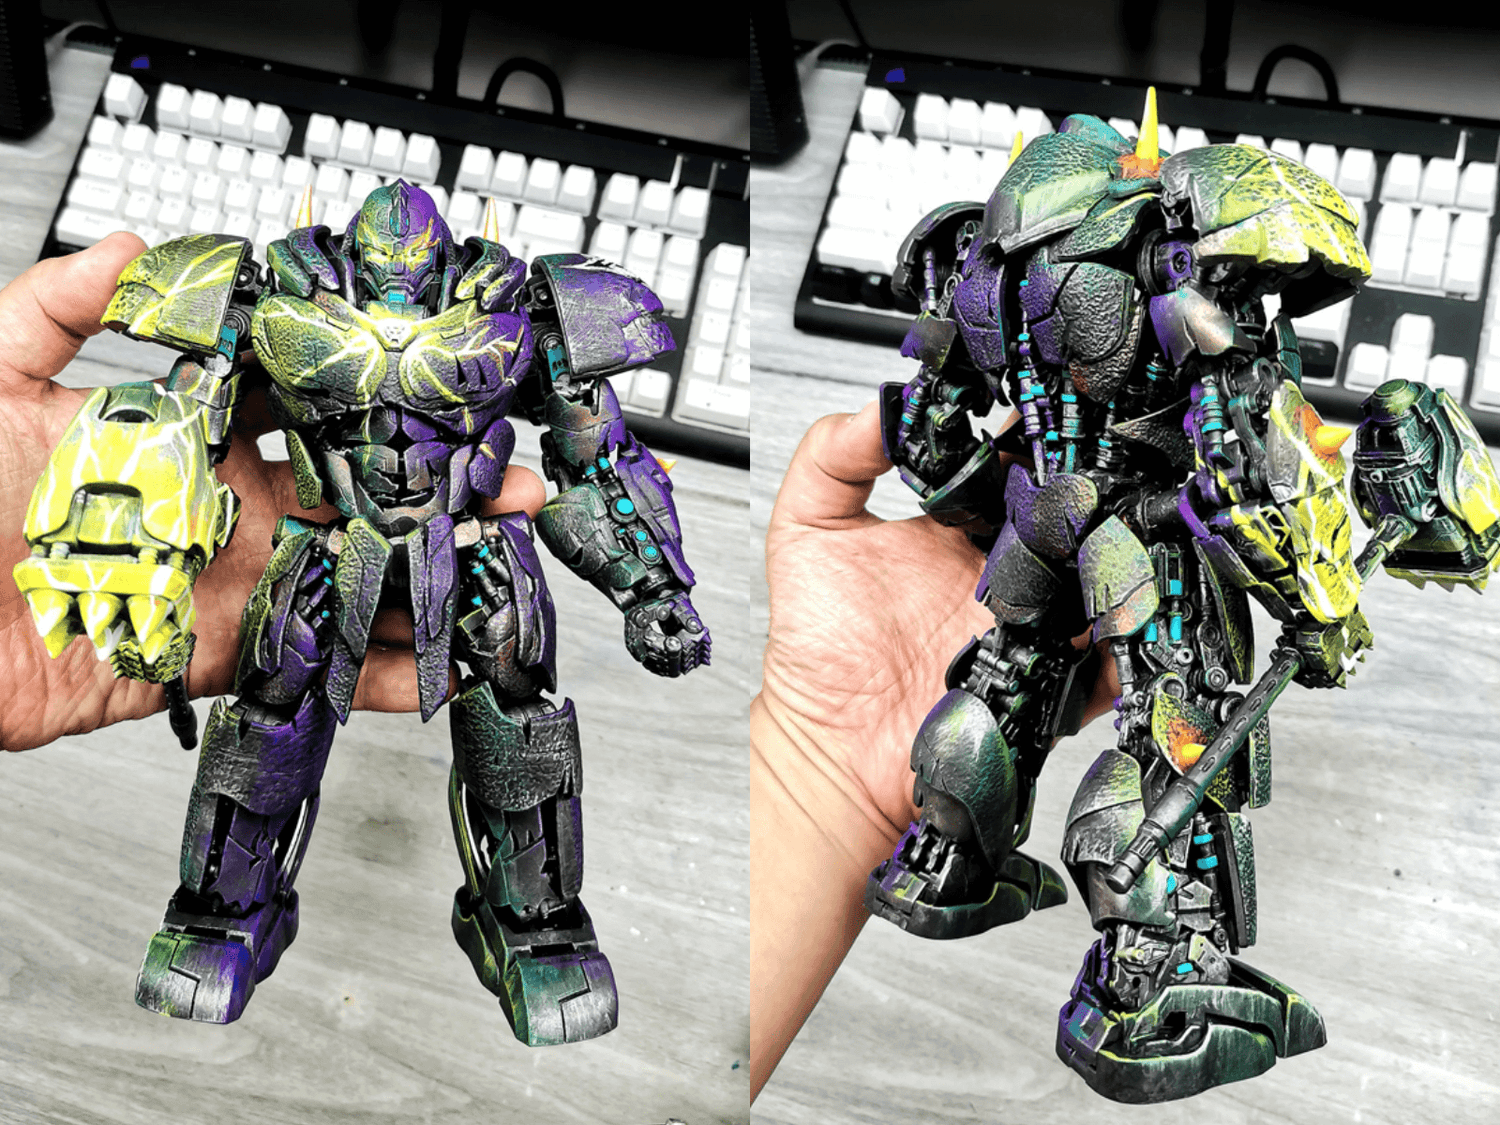
YOLOPARK is excited to share with you our fan @Rain Cifra’s process of repainting the Rhinox figure, taking you on a firsthand experience of creating a one-of-a-kind masterpiece!
Additionally, we've included a comprehensive video tutorial at the end of the article to help you master the techniques with ease.
Let's get started!

Step 1: Preparation
To achieve excellent results, preparation is key! Here is the list of tools used in this repainting process:
- Clear Water
- Metal Color
- BOSNY Clear
- Broad Flat Brush
- Two Small Dry Brushes
- A Flat Top Brush
- Tissues
- A Glue Gun
- Metal Wire
- Marker Pen
- A Pair of Nimble Hands
- High-pigmented water-based acrylic paint and water-based acrylic paint in colors (including black, purple, green, dark green, blue, dark blue, white, and yellow)
Step 2: Painting Techniques
Choosing the right material is crucial in creating outstanding repaint works. During the painting process, it's important to apply the paint evenly, avoiding drips or uneven coatings. For finer details, small brushes or airbrushes can be used for precise handling.
Here are some painting techniques that will help you create a unique masterpiece:
- Even Application:
Using a flat brush, apply the black water-based paint evenly on the surface of the Rhinox figure. Avoid excessive paint or drips during the process, and you can use a tissue to remove any excess paint that may affect the overall effect.

- Mixing and Blending:
Depending on your creativity and preferences, you can try mixing and blending different colors. This will make your artwork more vibrant and showcase your unique creativity.

For this Rhinox repaint, multiple colors were used for mixing and brush application. After applying the black paint, we mixed purple and violet together, loaded it onto the flat brush, and applied it to the entire left side of the Rhinox's body. For the right side, we used a small brush to apply pthalo green.

- Layering:

- Practice and Experimentation:
Painting is a creative process, and through continuous practice and experimentation, you will gradually master the techniques and develop your own style and skills.
Step 3: Detail Handling
Detail handling is crucial for elements such as textures, patterns, or specific areas. Use small brushes for precise detailing. In this step, we will focus on enhancing the visual effects of certain small elements.
Here are some tips for detail handling:
- Textures and Patterns:
Use small brushes or fine pens to add textures and patterns to the Rhinox figure. You can refer to photos or reference materials, carefully observe the texture of the Rhinox's skin, and recreate it as accurately as possible. This will enhance the realism and intricacy of your artwork.

- Shadows and Highlights:
Use different shades of colors to create shadows and highlights, adding a three-dimensional and lighting effect to your artwork. Observe the position and angle of the light source and add shadows and highlights accordingly to give the Rhinox figure a more solid and dimensional shape.

- Eyes and Facial Expressions:
The eyes and facial expressions of the Rhinox figure are vital elements that bring life and personality to the artwork. Use small brushes or fine pens to paint the eyes of the Rhinox, paying attention to details such as the gaze and shading of the eyelids. Adjusting the eyes and facial expressions will make the artwork more lively and expressive.

- Fine Detailing:
Add fine detailing to other parts of the artwork, such as the horns, iconic badges, and eyes, with textures, color variations, or subtle patterns. These small details will add visual appeal and uniqueness to your artwork.

- Final Observation and Adjustments:
After completing the detail handling, carefully observe the entire artwork to ensure that the details harmonize with each other and meet your expectations. Make necessary adjustments and corrections if needed to achieve the best possible effect.

Through detail handling, you can elevate your Rhinox repaint artwork to a new level, showcasing more intricacy and uniqueness. Practice and experiment with different techniques, develop your own style, and create awe-inspiring artworks!

Step 4: Coating Protection
To protect your repaint artwork, you can choose a suitable varnish or clear coat and apply it evenly on the surface of the toy, forming a protective layer. This not only safeguards the paint from wear and fading but also enhances the gloss and visual value of the artwork.

The following video is an incredibly detailed Rhinox repaint process shared by a YOLOPARK fan. Let's dive into this exciting journey together and create our own Transformers toy repaint artwork, showcasing unlimited creativity and imagination!
Leave a comment
This site is protected by hCaptcha and the hCaptcha Privacy Policy and Terms of Service apply.